Address Prerequisites
In this step your foundation team will address several prerequsites before you build out the initial form of your foundation.
1. Determine whether to reuse existing AWS Organizations management AWS account
Later in this guide you’ll be using AWS Control Tower to set up an initial landing zone or basis of your AWS environment. Since AWS Control Tower supports reusing existing AWS Organizations management AWS accounts and using newly created management AWS accounts, you need to decide which option best suites your needs.
Review Plan Your AWS Control Tower Landing Zone for guidance when considering whether or not to use an existing management AWS account.
If you have any doubts about the quality of an existing management AWS account, then it’s recommended that you create a new management AWS account via this guide to support your new AWS environment. You can easily move existing AWS accounts into your new management AWS account later on.
2. Create email addresses for new AWS accounts
Regardless as to whether you create a new management AWS account or reuse an existing management AWS account, you’ll need to prepare a set of email addresses to represent the root user of each of the new AWS accounts that will be created. In later steps, when you create AWS accounts, you’ll be referring to these email addresses. Each AWS account must have a unique email address associated with it.
Use either email distribution lists (DLs) or shared mailboxes
Instead of using a person’s email address, it’s recommended that you use either email distribution lists (DLs) or shared mailboxes so that you can enable at least several trusted people, for example, your Cloud Administrators, access to email messages associated with each AWS account.
Carefully control access to the email accounts
Since the email address associated with an AWS account is used as the root user login for the account, anyone with access to that email account will have access to password reset process for the account.
Define and request DLs or shared mailboxes
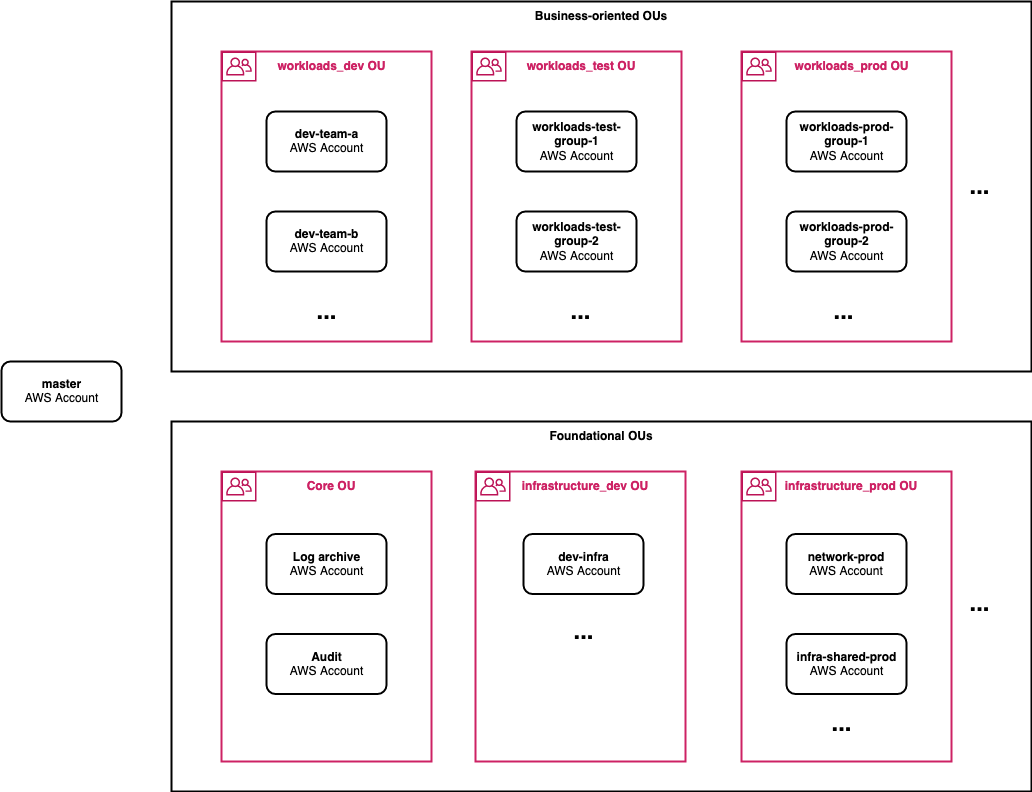
The following diagram and table includes the minimum set of email addresses to get started. Each AWS account must have a globally unique email address.
Several optional AWS accounts and email addresses are included in the table depending on the extent of capabilities you expect to require in the initial form of your AWS environment.
If you already have a naming standard for mail addresses associated with services, you should use that standard format and include references to at least “aws” and and an abbreviation of the unique role or purpose of each account.
Use your standard internal process to request either DLs or shared mailboxes based on set of addresses you identify.
Reusing existing management AWS account: If you’re reusing an existing management AWS account, you’ll reuse the email address associated with that account.
Management AWS account
| AWS Account Name | Purpose | Example Email Address |
|---|---|---|
management |
You’ll either create a new managemnt AWS account or reuse an existing compatible AWS account. | aws-account-management@example.com |
Foundational AWS accounts
| AWS Account Name | Purpose | Example Email Address |
|---|---|---|
Audit |
Created by AWS Control Tower. | aws-account-audit@example.com |
Log archive |
Created by AWS Control Tower. | aws-account-log-archive@example.com |
dev-infra |
Environment where your Cloud Foundation team can develop and perform early testing of foundation changes. If you have a very small cross-functional team responsible for managing your initial foundation, then you’ll likely need to start with only one foundation team development AWS account. |
aws-account-dev-infra@example.com |
network-prod |
Centrally managed network resources. For example, hybrid networking resources such as AWS Site-to-Site VPN and AWS Transit Gateway resources. |
aws-account-network-prod@example.com |
infra-shared-prod |
Shared infrastructure services. Recommended if you plan to connect your on-premises network to your AWS environment. For example, this AWS account can host shared directory services such as Microsoft Active Directory and contain resources to support integration with your on-premises DNS services. |
aws-account-infra-shared-prod@example.com |
Other AWS accounts
| AWS Account Name | Purpose | Example Email Address |
|---|---|---|
dev-<team identifier> |
A team development environment for your builder team that needs to experiment, develop, and perform early testing of their initial workloads. You should 1) identify how many distinct teams will be developing and performing early testing of your initial workloads and 2) arrive at an AWS account name and email address for each team. |
aws-account-dev-<team identifier>@example.com |
workloads-test-<workload group identifier> |
Formal test environments for your business-oriented workloads and data. You should 1) identify how many distinct groups of related workloads you’ll initially be supporting and 2) arrive at an AWS account name and email address for each distinct group. For example workloads-test-sap, and workloads-prod-sap. |
aws-account-workloads-test-<workload-group-identifier>@example.com |
workloads-prod-<workload group identifier> |
Environment where your initial production workloads and data will reside. | aws-account-workloads-prod-<workload-group-identifier>@example.com |
Use of “+” style email addresses: If your email system supports the use of “+” style email addresses in which email multiple email addresses are aliased to the same email account, then you might find it beneficial to use this form to consolidate the root user email addresses for either all or collections of AWS accounts to either one or a few actual email accounts. For example: aws-account1+management@example.com and aws-account1+audit@example.com will be treated as unique addresses in AWS but your mail system may deliver the mail to the same aws-account1@example.com email address.
3. Obtain non-overlapping IP address range
If your initial proof of value workloads will require AWS networking resources, then you should address this prerequisite. If your initial workloads don’t depend on AWS networking resources, you can skip this step. For example, if your initial workloads use Amazon Simple Storage Service (Amazon S3), they might not need AWS networking resources.
In this step you should consult with your existing Network team to obtain a suitably sized, non-overlapping IP address range or CIDR block that can be used not only for the initial shared development network that will be set up in this guide, but also to accommodate test and and production networks that you will provision on AWS as you progress in your journey.
Since you will likely interconnect at least a portion of your on-premises networks to your emerging AWS hosted networks, a best practice is to assign a large IP address range or CIDR block for use in AWS that does not overlap with your existing allocated IP addresses. By using non-overlapping IP address ranges, you will avoid needing to introduce a complicated network address translation (NAT) solution.
Recommended IP address range size
Ideally, taking into account future networks beyond the initial development network, you should obtain for your use of AWS overall, an IP address range or CIDR block of at least size /18 to /16.
If the desired sizes of non-overlapping CIDR block cannot be obtained at this stage, you should obtain a block of at least size /22 to address the initial shared development network. You can obtain additional non-overlapping CIDR blocks later to support your build out of test and production networks.
Larger CIDR range is better: Although 1,000 IP addresses may sound like a lot, don’t assume that it’s a sufficiently sized range even for your initial few workloads. Since your initial shared development environment will likely have at least 4 subnets, when you divide a /22 CIDR block across the 4 subnets, you end up with only 254 IP available addresses per subnet. Using a /23 block would leave only 126 IP addresses per subnet. Depending on the number of workloads your infrastructure and workload builder teams will be experimenting and testing, these smaller ranges can end up being exhausted faster than you might expect.
Unable to obtain non-overlapping IP address range
If you cannot obtain a non-overlapping CIDR block at this stage, you can temporarily use an overlapping block for your initial shared development network.
In the future, when you need to interconnect a portion of your existing on-premises network, you will need to create a new VPC with a non-overlapping CIDR block, migrate the workloads to the new VPC, and decommission the old VPC.
Resources
4. Decide on an organizational identifier
Since you will be assigning names to centrally managed cloud resources while you follow the steps in this guide, it’s useful for you to decide on a unique organizational identifier to assign as a prefix to those names so that:
- Names of your resources won’t collide with other names when working in global namespaces.
- You’ll be able to create security policies to restrict access based on resources with that prefix.
You likely already use a stock ticker or another similar abbreviation within technical names in support of current business and IT processes. One of these existing identifiers might be appropriate to carry forward as you build out your cloud environment.
You should limit the length of the abbeviated organization identifier to a handful of characters. Using no more than 4-5 characters is a good guide.
As an example, this guide uses the prefix example throughout. As you progress through the guide, you’re expected to replace this example prefix with your own identifier.
More extensive resource naming standards: As you progress on your journey, you may find it useful to adopt more extensive cloud resource naming standards.
5. Identify your preferred AWS Region(s)
AWS provides you with a diverse set of AWS Regions in which you can deploy and operate your workloads. You’ll need to identity the Region(s) in which you’ll deploy your first proof of value workloads into production. See AWS Regions and Availability Zones for a list of the current regions.
This step-by-step instructions in this guide assume that you’ll focus on using a single Region in this early stage of your journey.
Specify a “home” Region for AWS Control Tower: In the next section, when you build out the base foundation of your AWS environment using the AWS Control Tower service, you will need to specify a “home” AWS Region in which AWS Control Tower will configure a set of resources. Typically, this Region will be the same Region in which you expect to host most of your initial workloads.